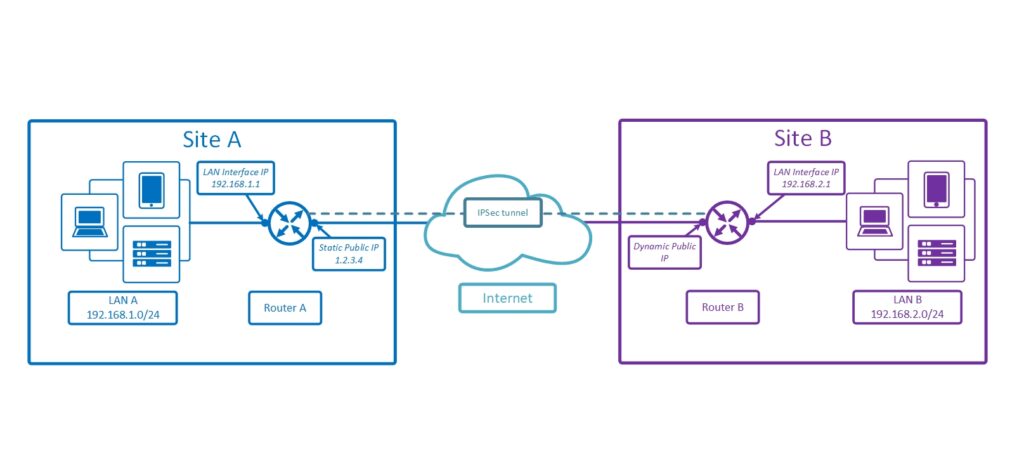
Configuring an IPSec tunnel between two MikroTik routers (RouterOS 7) involves creating secure tunnels for communication. These could either be a home router (such as a hAP ax2) or a Mikrtoik CHR hosted in the cloud, any RouterOS device will work provided they have direct internet connectivity. Here’s a step-by-step guide for your setup:

IPSec Tunnel Prerequisites
- Router A: Static public IP address.
- Router B: Dynamic public IP address (using MikroTik’s Cloud DDNS).
- Both routers should be running RouterOS v7 or later.
Stage 1: Configure the IPSec tunnels
Step 1: Set up MikroTik Cloud DDNS on Router B
- Log in to Router B via Winbox or CLI.
- Go to IP > Cloud.
- Enable the cloud service by checking DDNS Enabled.
- Note the DDNS name displayed (e.g.,
routerb.sn.mynetname.net).
Step 2: Configure IPsec on Router A (Static IP)
Phase 1: Define the Peer
- Go to IP > IPsec > Peers.
- Add a new peer:
- Address:
routerb.sn.mynetname.net(Router B’s DDNS name). - Port:
500(default for IKE). - Exchange Mode:
ike2. - Secret: Leave empty (configured later in Identity).
- Local Address: Router A’s static public IP.
- Other options can be left as default.
Phase 2: Configure the Identity
- Go to IP > IPsec > Identities.
- Add a new identity:
- Peer: Select the peer created above.
- Auth. Method:
pre-shared-key. - Secret: Enter a strong pre-shared key (e.g.,
HelloWorld123). - Other options can remain default.
Phase 3: Create Proposals
- Go to IP > IPsec > Proposals.
- Add a new proposal:
- Name:
defaultor any meaningful name. - Auth. Algorithms:
sha256. - Enc. Algorithms:
aes-256-cbc. - PFS Group:
none(or as per your security requirements).
Phase 4: Add Policies
- Go to IP > IPsec > Policies.
- Add a new policy:
- Src. Address: LAN subnet of Router A (e.g.,
192.168.1.0/24). - Dst. Address: LAN subnet of Router B (e.g.,
192.168.2.0/24). - Action:
encrypt. - Level:
require. - IPsec Protocol:
esp. - Select the proposal created earlier.
Step 3: Configure IPsec on Router B (Dynamic IP)
Phase 1: Define the Peer
- Go to IP > IPsec > Peers.
- Add a new peer:
- Address:
Router A's static IP address. - Port:
500. - Exchange Mode:
ike2. - Local Address: Leave empty.
- Other options can remain default.
Phase 2: Configure the Identity
- Go to IP > IPsec > Identities.
- Add a new identity:
- Peer: Select the peer created above.
- Auth. Method:
pre-shared-key. - Secret: Use the same pre-shared key as on Router A.
Phase 3: Create Proposals
- Go to IP > IPsec > Proposals.
- Use the same settings as Router A:
- Auth. Algorithms:
sha256. - Enc. Algorithms:
aes-256-cbc. - PFS Group:
none.
Phase 4: Add Policies
- Go to IP > IPsec > Policies.
- Add a new policy:
- Src. Address: LAN subnet of Router B (e.g.,
192.168.2.0/24). - Dst. Address: LAN subnet of Router A (e.g.,
192.168.1.0/24). - Action:
encrypt. - Level:
require. - IPsec Protocol:
esp.
Step 4: Test the Tunnel
- From Router A’s LAN, ping a device in Router B’s LAN.
- Verify the tunnel status in IP > IPsec > Installed SAs on both routers.
- Ensure policies and connections are active.
Additional Tips
- Firewall Rules: Ensure IPsec traffic is allowed in the firewall. Add rules for UDP ports
500and4500and protocolESP. - Dynamic DNS Update: Router A will automatically resolve Router B’s DDNS to the current IP. No manual update is needed.
- Troubleshooting:
- Use Log (System > Logging) to monitor IPsec events.
- Ensure NAT bypass rules are configured if NAT is in use on either router.
This configuration creates a stable IPsec tunnel between the two MikroTik routers, even with a dynamic IP on one end.
Stage 2: Configuring NAT polices
To ensure the IPsec traffic bypasses NAT on both routers, you need to configure No-NAT policies. These rules ensure that the traffic between the subnets of Router A and Router B is not altered by NAT. Here’s how to add them to the configuration:
Step 1: Add No-NAT Policies on Router A (Static IP)
- Go to: IP > Firewall > NAT.
- Add a New NAT Rule:
- Chain:
srcnat. - Src. Address: Router A’s LAN subnet (e.g.,
192.168.1.0/24). - Dst. Address: Router B’s LAN subnet (e.g.,
192.168.2.0/24). - Action:
accept.
- Chain:
- Move the No-NAT rule above any other
srcnatormasqueraderules.
Step 2: Add No-NAT Policies on Router B (Dynamic IP)
- Go to: IP > Firewall > NAT.
- Add a New NAT Rule:
- Chain:
srcnat. - Src. Address: Router B’s LAN subnet (e.g.,
192.168.2.0/24). - Dst. Address: Router A’s LAN subnet (e.g.,
192.168.1.0/24). - Action:
accept.
- Chain:
- Move the No-NAT rule above any other
srcnatormasqueraderules.
Step 3: Confirm NAT Bypass
- Go to IP > Firewall > Connections on both routers.
- Filter connections to view traffic between the LAN subnets of Router A and Router B.
- Ensure that traffic is not being NATed (the original LAN addresses should be visible).
Step 4: Test the IPsec Tunnel
- Use ping to test connectivity from a device in Router A’s LAN (e.g.,
192.168.1.100) to a device in Router B’s LAN (e.g.,192.168.2.100). - Verify that:
- Traffic flows without NAT.
- The IPsec tunnel encrypts traffic (check IPsec > Installed SAs for active sessions).
Why is this Important?
- No-NAT rules ensure that the internal IP addresses (private LAN subnets) are preserved for traffic that matches the IPsec policy.
- NATing such traffic can disrupt IPsec operations because it changes the source/destination addresses, causing mismatches in the tunnel policies.
With these adjustments, your setup will handle IPsec traffic correctly while preventing NAT from interfering.
Read more on the MikroTik WiKi


